Battery switch on travel trailer function is crucial for managing your RV’s power. Understanding how to use your battery switch—whether it’s a simple 1-2-both or a more complex system—is key to preventing electrical issues and maximizing battery life. This guide will walk you through the different types of switches, how to connect and disconnect your batteries safely, troubleshoot common problems, and optimize your energy management.
We’ll also cover how the battery switch interacts with other systems like solar panels and inverters.
This comprehensive guide will equip you with the knowledge to confidently handle your travel trailer’s battery system, ensuring smooth and reliable power for your adventures. From understanding the basic wiring to advanced troubleshooting techniques, we’ll cover it all in a clear, easy-to-follow manner. Let’s dive into the world of RV battery management!
Understanding Battery Switch Functionality in Travel Trailers: Battery Switch On Travel Trailer Function
A battery switch is a crucial component in a travel trailer’s electrical system, allowing you to control the flow of power from your trailer batteries. This control is essential for managing battery power, preventing accidental drain, and ensuring the longevity of your batteries. Understanding how it works is key to maintaining your RV’s electrical system effectively.
Battery Switch Types
Travel trailers typically utilize battery switches to manage one or more house batteries and potentially a starting battery for the tow vehicle. Common types include the 1-2-Both switch and the 1-2-Off switch. The 1-2-Both switch allows you to select either battery 1, battery 2, or both batteries to power your trailer’s systems. The 1-2-Off switch offers the same selection but also includes an “off” position to completely disconnect both batteries from the trailer’s electrical system.
This “off” position is vital for preventing parasitic drain when the trailer is stored for extended periods.
Typical Battery Switch Wiring Diagram
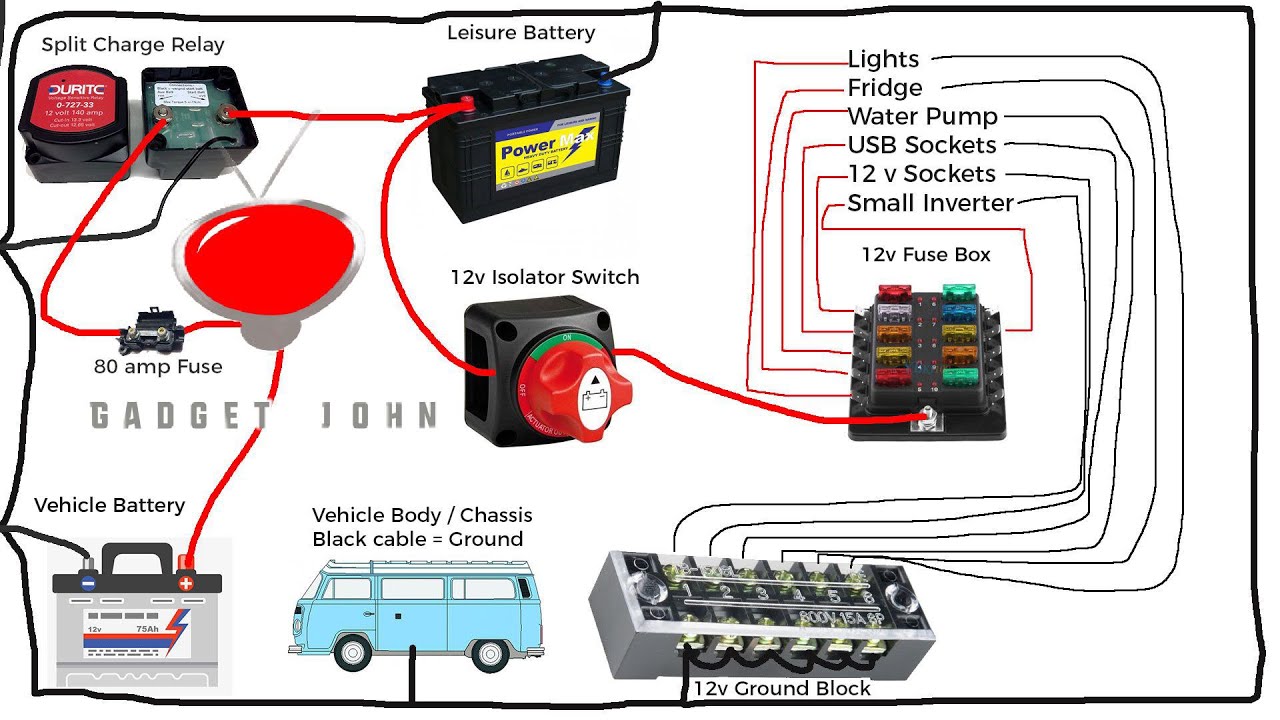
A typical setup involves two batteries connected to the switch. Each battery has a positive (+) and negative (-) terminal. The positive terminals of each battery are connected to separate input terminals on the battery switch. The output terminal of the battery switch is then connected to the positive bus bar of the trailer’s electrical system. Similarly, the negative terminals of each battery are connected to a common negative bus bar, ensuring a complete circuit.
A properly wired system ensures that power flows only when the switch is in the desired position. A visual representation would show two batteries, each with positive and negative leads, connecting to the switch’s input terminals. The switch’s output terminal then connects to the positive bus bar. The negative terminals of both batteries connect directly to the negative bus bar.
So, you’re an audiophile who loves to travel? Awesome! Check out this guide on audiophile travel setups to make sure your tunes sound amazing wherever you go. Then, once you’ve got your music sorted, think about powering your adventures. Understanding the battery switch on travel trailer function is crucial for keeping your lights and other appliances running smoothly on the road.
It’s all about maximizing your enjoyment, whether it’s killer sound or reliable power!
This arrangement ensures efficient power distribution and control.
Installing a Battery Switch
Installing a battery switch requires basic electrical knowledge and adherence to safety precautions. Always disconnect the negative terminal of your batteries before beginning any work.
- Gather your materials: This includes the battery switch itself, appropriate gauge wiring, connectors, and any necessary mounting hardware.
- Choose a mounting location: Select a location that’s easily accessible and protected from the elements.
- Mount the switch: Securely mount the switch using the provided hardware.
- Connect the positive wires: Connect the positive wire from each battery to the corresponding input terminal on the switch. Use appropriately sized wire connectors to ensure a secure connection.
- Connect the negative wires: Connect the negative terminals of both batteries to the negative bus bar. Again, use appropriate connectors.
- Connect the output wire: Connect the output terminal of the switch to the positive bus bar of your trailer’s electrical system.
- Reconnect the negative battery terminals: Reconnect the negative terminals of your batteries.
- Test the system: Turn the switch to each position (1, 2, Both, Off) and verify the functionality of your trailer’s electrical systems.
Always consult your specific battery switch’s instructions and consider seeking professional help if you’re unsure about any step. Incorrect wiring can lead to damage or even fire.
Connecting and Disconnecting Batteries

Properly connecting and disconnecting your travel trailer’s batteries is crucial for safety and to avoid damaging your electrical system. This section details the process using your battery switch, along with best practices and safety precautions. Understanding the switch’s function is key to preventing accidental disconnections and ensuring your appliances work correctly.
Your battery switch likely has several positions, controlling the flow of power between your chassis battery (used for starting your tow vehicle) and your house battery (powering your trailer’s interior systems). The exact positions and labeling might vary slightly depending on your switch’s manufacturer, so always consult your switch’s manual for specific instructions. However, the general principles Artikeld below remain consistent.
Connecting and Disconnecting Batteries Using the Switch
Connecting and disconnecting your batteries is typically a simple process involving the battery switch. Most switches have clearly labeled positions. To connect the house battery, move the switch to the appropriate position; for example, “Both,” “House,” or a similar designation. To connect the chassis battery, the switch should be in the “Start” or “Chassis” position, or a position that connects only the chassis battery.
To disconnect both batteries, switch to the “Off” position. Remember to always disconnect the batteries before performing any maintenance or repairs on the electrical system.
So, you’re an audiophile who loves to travel? Awesome! Check out this guide on audiophile travel setups to ensure your listening experience remains top-notch on the go. Knowing how to pack your gear properly is key, and that leads us to another important aspect of travel: power. Understanding the battery switch on travel trailer function is crucial if you’re using a campervan or trailer, preventing unexpected power drain and keeping your tunes playing all day long.
Proper power management is just as important as great sound!
Preventing Accidental Disconnections
Accidental disconnections can be frustrating and potentially damaging. To prevent this, ensure the switch is securely in its desired position. Avoid accidentally bumping or jarring the switch while traveling. If your switch has a locking mechanism, use it. Regularly inspect the switch and its connections for any signs of damage or looseness.
Consider using a switch cover to prevent accidental operation, particularly if you have children or pets.
Battery Switch Positions and Their Effects
The following table illustrates the typical positions of a battery switch and their effects on the connection of house and chassis batteries. Remember that the exact labels may differ based on the manufacturer of your switch.
| Switch Position | House Battery Connection | Chassis Battery Connection | Notes |
|---|---|---|---|
| Off | Disconnected | Disconnected | All power to both batteries is cut. Safe for maintenance. |
| House | Connected | Disconnected | Power only to house systems. Chassis battery is isolated. |
| Both | Connected | Connected | Power to both house and chassis systems. Use caution. |
| Start/Chassis | Disconnected | Connected | Power only to the chassis battery (for starting the vehicle). |
Safety Precautions When Working with Batteries and Electrical Systems
Working with batteries and electrical systems requires caution. Always wear appropriate safety gear, including eye protection and gloves. Ensure proper ventilation when working with batteries, as they can release flammable gases. Never allow metal tools to touch both battery terminals simultaneously, as this can cause a short circuit. If you’re unsure about any aspect of your electrical system, consult a qualified RV technician.
Troubleshooting Common Battery Switch Issues
Your travel trailer’s battery switch is a crucial component, and when it malfunctions, it can leave you stranded without power. Understanding the common problems and how to troubleshoot them can save you time, frustration, and potentially a costly repair. This section will guide you through diagnosing and fixing typical battery switch issues.
Battery switch problems usually stem from three main sources: corrosion, loose connections, and switch failure itself. Corrosion builds up over time, especially in humid climates, creating resistance and preventing proper current flow. Loose connections, often caused by vibration during travel, can lead to intermittent power or complete failure. Finally, the switch itself can simply wear out or become damaged, requiring replacement.
Identifying Common Battery Switch Problems
Corrosion is a frequent culprit. You’ll often see a white, green, or bluish-gray powdery substance around the terminals and switch contacts. This buildup inhibits electrical conductivity. Loose connections, on the other hand, might be visible as slightly separated wires or terminals that don’t make firm contact. A failed switch might show no signs of physical damage but simply refuse to operate correctly.
You might notice a burning smell or hear unusual clicking sounds if the switch is struggling.
Troubleshooting Steps for a Non-Functional Battery Switch
Before you start, always disconnect the negative (-) battery cable from both the trailer battery and the vehicle battery to prevent accidental shorts. Safety first!
- Inspect for Corrosion: Carefully examine all connections and the switch itself for signs of corrosion. Use a wire brush or sandpaper to clean any corroded areas. Apply a corrosion inhibitor to prevent future buildup. Remember to clean both the battery terminals and the switch terminals thoroughly.
- Check for Loose Connections: Ensure all wires are securely fastened to their terminals. Tighten any loose connections using the appropriate tools. If the terminals are damaged, replace them.
- Test the Switch: With the negative cables disconnected, use a multimeter to check the continuity of the switch in each position. If the switch doesn’t show continuity when it should, the switch itself is likely faulty and needs replacing. A multimeter can verify whether the switch is correctly routing power between the batteries and the trailer.
- Verify Power Supply: Make sure your batteries are charged. Use a multimeter to check the voltage of both your trailer battery and your tow vehicle battery. If the voltage is low, charge the batteries before proceeding. Low voltage can mimic a switch problem.
Potential Solutions for Common Battery Switch Problems
Cleaning corrosion is usually straightforward. A wire brush and a little elbow grease often suffice. Replacing loose connections is equally simple, requiring only tightening or replacing the terminals. If the switch itself is faulty, replacement is necessary. This often involves removing the old switch and installing a new one, ensuring all connections are secure and properly insulated.
For stubborn corrosion, a battery terminal cleaner might be necessary. Always follow the manufacturer’s instructions when working with electrical components.
Troubleshooting Flowchart, Battery switch on travel trailer function
This flowchart Artikels a systematic approach to diagnosing a non-functional battery switch.
- Start: Is the battery switch not working?
- YES: Disconnect negative battery cables.
- Inspect for Corrosion: Is there visible corrosion?
- YES: Clean corrosion, re-tighten connections, test.
- NO: Check for loose connections.
- Loose Connections Found?: Tighten connections, test.
- NO: Test switch continuity with a multimeter.
- Switch Faulty?: Replace the switch.
- NO: Check battery voltage. Low voltage? Charge batteries.
- Problem Solved?: YES – End. NO – Seek professional help.
Mastering your travel trailer’s battery switch is essential for safe and efficient RVing. By understanding its function, properly connecting and disconnecting your batteries, and troubleshooting common issues, you’ll ensure a reliable power supply for all your onboard systems. Remember to always prioritize safety when working with electrical components and consult a professional if you’re unsure about any aspect of your system.
Happy travels!
Popular Questions
What happens if I leave my battery switch in the “off” position for an extended period?
Leaving the switch off for too long won’t damage the switch itself, but it will prevent charging of your house batteries. This can lead to a dead battery and potential problems with other systems.
Can I use a battery switch with lithium batteries?
Yes, but some lithium battery systems may require a different type of switch or additional safety features. Consult your battery’s manual and/or a qualified technician for guidance.
My battery switch feels loose. Is this a problem?
A loose battery switch is a safety hazard and could lead to poor connections or even a fire. Tighten the switch if possible, but if the problem persists, replace the switch immediately.
How often should I check my battery switch connections for corrosion?
Ideally, inspect your connections every few months, especially if you live in a humid climate. Corrosion can significantly impede power flow.
